We just got started and got out the way some initial introductions. Time for action!
First fight
Talk to shadeling on right.

You can choose Tell me or I’m fine. Obviously, select first choice.
Alright, I’ll teach you.
And I will comment along the way.
First, let’s talk equipment. Now, in battles, of course you’ve got attack, defend, items and all that… but you need to equip those actions beforehand. Open the Skill Equip menu, equip Shock and Guard, then talk to me again.
Click X. You will see menu that you already seen when you tried to save game.

Skill Equip option in menu is already highlighted. Click Z. Now you see equipment screen.

At upper left you have your stats. Below you have window with equipped Skills and Accessories. At right there are all unequipped things you have or know. At bottom is space for descriptions. Hmm, looks like you already have equipped Guard and Shock!
Okay, lets train equipping with Flee. First, use up and down arrows – you will move between Skills and Accessories. You can notice that currently you have no accessories and there is slot only for one accessory. Make sure you have marked Skills and click Z. Now you can select any skill. At bottom you will see short description of selected skill. Note you can move selection to empty slot – in total you can equip five skills at once. Selecting proper skill set is critical for dealing with enemies, especially in first half of game and bosses.
Select first empty slot and click Z again. Yes, interface could be made better (for once, you could skip Skill/Accessory selection, as there are only six slots in total anyway).

Now you can move selection in right window to choose unequipped skill to equip. To do that, you use… yes, you guessed it… Z key. Focus will be back on left Skills window.

You can also remove selected skill using Shift key (only when already selected it… creator of game really need few courses in User Interface 101). Try it. Now you should have screen like on beginning. Use X to go back to Skill/Accessory selection, another X to enter menu and X again to return back to proper game. Sheesh.
Let’s take look at your current skills in details.
- [Guard] Halves damage taken. Pretty much straightforward. It is useful, as you sometime have to wait for possibility to use powerful attacks.
- [Shock] EC-1 Inflicts damage (C). You have to pay 1 EC (shadeling will talk about EC soon) to use this skill. (C) is class of attack – C is weakest, B is stronger and A is strongest.
- [Flee] LP-10% Escapes the battle. You lose 10% of your LP (health) to use it. Basically useless.
Talk again to shadeling.
Ready for battle?

Obviously, you select I’m ready.
Then let’s begin. Good luck.
Screen changes to battle mode. Game helpfully informs you that your opponent is Mr. Shadeling. Don’t worry, I will show combat screen soon.
First, let’s see what’s on screen.
A rrow appears, pointing at one of bars on right, marked with LP letters.
Here’s your LP, Alice. It goes down from enemy attacks, and when it’s 0, you get sent back. No other penalties, though. Won’t lose Force or anything.
F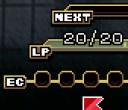 orce is something like both exp and money. Another arrow appears, showing row of circles under LP gauge and marked with EC letters.
These are ECs (Emotion Crystals). You get one each turn. You use these up to do things like attack foes or heal yourself. They go to 0 when a fight’s over, so use them while you’ve got ’em.
T w
w o arrows one after another, pointing at bars with NEXT letters.
These are the move gauges. Fighters can act once they fill up. The gauge fills up faster the higher your AGL stat. Next, I’ll explain what happens once your gauge fills.
Move gauges, both yours and Mr Shadeling’s, start to fill.

Your fills first. Surprised? Not really.
Gauge full, your turn. You’ve got one EC, too. You can use Shock and Guard, which you equipped earlier. Try out Guard.
Now you are in control.

Above yourself you can see five slots, two with skills. Currently selected is Guard. With left/right arrow you can change selected skill. Click Z to execute skill. You have to use Guard, as Shock for now will do nothing. As action, Mr. Shadeling chooses Just Watch. When you get another turn, he comments:
You stocked another EC. You can use Guard or items to stock up on ECs, which is good for skills that take two or more. The enemy’s got invisible ECs too. And they can Guard to stock up. If they keep guarding, watch out! Now, defeat me with an attack.
Only now Shadeling’s LP gauge is filled up. Select Shock. You will deal 15 damage and defeat Mr. Shadeling. Game informs you about gained Force points and amount of turns that this battle took.
That’s all I have to say on battles. Thanks for listening! Here’s a present for your trouble.

Hope I could help you on your adventure, Alice!
Yay, our first gained skill! Take look at it.
- [Spirit Thorn] LP-5 Inflicts damage (C). This attack will deal similiar damage to Shock, but will use up your own health instead of EC. For now, using it is a little too costly (you have only 20 LP), but equip it anyway to your empty slot. Damage dealt by this skill is significantly larger than Shock, even thought it is same class.
By the way, important note: get used to skills that hurts you. There is ton of skills with this property. I will say more – considering nature of game and plot, it is very fitting…
Now is also good moment to describe stats.
LP (Stamina) – your health. When it falls to 0, you will be sent back to Land of Time. Wardens of Time cannot be killed by normal means. You start with 20 points.
PSY (Power) – strength of your attacks and your healing. Starting amount is 15 points.
AGL (Speed) – make move gauge fills faster. You really do not want to get attacked twice in row by enemy. Your start amount is 15 points.
Before we enter virtual training grounds for young Wardens of Time, let’s return to Shadeling Town for a moment. Guy that informed you about town now has additional comment.
All the Shadelings went off to play in the Land of Live. Can you believe that? With all those Time Scars around?
Time Scars, huh. Tiska mentioned something about bad guys. Seems like Alice will have to fight with these Scars in Land of Life. Okay, next task: shop near this shadeling is already opened.

Shopkeeper helpfully informs about purpose of shop:
At Dreamling’s, you can trade Force for items you’ve picked up before. Be sure to come by anytime you find a new item!
As we did not acquired any item yet, there is nothing much to do. Eh, I bet prices in this shop will be as exorbitant as in any other RPG anyway. Exit shop and walk south. Talk again to gardener shadeling.
Do you have any interest in gardening, Alice?

I don’t will cause only I see… comment. I advise you to take on his offer.
Well, would you raise some flowers? Plant some seeds in the bed here, and wait for them to ripen. You can harvest your crop, so give it a try.

That seed’s on me. Try planting it in this flower bed.
Take a look at item.
- [Repose Seed] Heals wounds (50) – exactly what it says on tin. If equipped (yes, you equip items in same way as skills and there is no separate slots for items) and used during combat, it will regenerate up to 50 LP. Used up slot will not be filled with another item of same (or any) type from inventory. Bah.
Now plant seed. There is empty bed at left from gardener. Walk to it and click Z.

After planting you will see dot in bed. Flower bed has space for two planted seeds at once. After clicking Z again, you get statistics about planted seed…
Repose Seed
Growth rate: 0/10 Nutrition: 0
…and options for Harvest and Do nothing. Better to wait for something more interesting before harvest. Maybe gardener knows how to grow seed.
A planted seed can grow from the power released from Time Scars. I speak, of course, of battles. How much Force you get will also affect how it blooms.
We will check on our seed after virtual training (I am somehow sure it will count). Let’s visit shop before returning to Core. After all, Alice encountered new item.
Come on in! Welcome to Dreamling’s!

After selecting Trade you can see shop screen:

You can see currently known items and their price. At bottom is short description and count of already owned items of given type. Last but not least there is also information about current amount of Force points. Obviously, we cannot buy more Repose Seeds, even if we wanted to.
Return to Time Core to room with three shadelings and enter training grounds through door.
– Time Primer –

Doors opens with strong creak.
Virtual reality

Alice looks around.
Nah, I’m not there. I’m watching from the Time Core. This is virtual training area made for time wardens. The Land of Life is real dangerous when time’s stopped, you see. If you want to search it, you’d better study up here. Up for it? Then walk forward.
This area is apparently called Time Primer – The Hand Guiding Alice. Do as he say and walk straight forward.
Time-stopped worlds have these impurities running about, called “Time Scars.” They’re bad guys who’ll hurt you, so beat ’em up when you find ’em. Oh, and keep an eye on your LP. If it gets real low, you’ll be better off running to last longer.
Wa lk to right – you probably want to check that strange pink sphere just in front of entrance to building. Interact with it.
That’s a Scarlet Cog. Scarlet Cogs use the hand’s power to keep creating Time Scars. So it’s a den of monsters, say. Apparently it’s a time warden’s job to break these and get the hands back. By the way, you have to break all the Blue Cogs before you can get at this one. There are some in this area, so take a look around.
Walk around more. You will inevitably run into random encounter with Time Scar. These are easier to deal with than Scars that defend cogs. We will talk about harder kind later. In any case, Time Scars aren’t animals, monsters or people. They do not have actual names – they are concepts and called accordingly.
All normal enemies here are easily defeated without upgrading stats, making it nice grounds for some beginner grinding. While unneccessary, use Guard at least once during each battle – remember, info hut provided you with this tip: “*ura – Use Gu*** in battle * times.”. Take in account you already used Guard at least once with that shadeling in Time Core.
For now, let’s see what we will encounter normally. Enemies defending cogs will be described separately.
U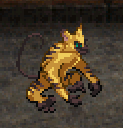 nconfirmed – Looking a little like gold-haired, green-eyed monkeys, these guys will be faster than Alice with starting AGL. Simply attack it with Shock twice. To minimize damage, raise AGL to level when ape will lose initiative (17 points).
- Tactics: At least 17 AGL needed, Shock twice.
- Skills: Shock, ? (never used), Flee (never used).
P rickle – Strange bugs. They are slightly more resistant to your attacks, but two Shocks will do anyway.
- Tactics: Shock twice.
- Skills: Shock, Guard, Flee (never used).
M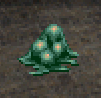 elted Scar – Horrible bumbling mass of something. After taking damage, it likes to heal some of it. As usual, two Shocks will take care of it, even with healing. In fact, it is only enemy that you can defeat without loss in LP, if lucky.
- Tactics: Shock twice.
- Skills: Guard (never used), Shock, Regenerate.
After winning battle you regenerate some lost LP automatically. Rest is gained by walking it off, talking to Tiska or sleeping in your bed. Now that you gained some decent amount of Force, you can buy stat upgrade. Click X and use second icon from left with Alice’s head.

You can choose stat with arrows and click Z to raise it. Each buy raises cost of next stat upgrade, both current and rest of them. Choose wisely. As general advice, I buy a few points in LP, then PSY, then AGL, then back to LP. But in case of training grounds, you should raise AGL to 17 first to deal with Unconfirmed and LP to at least 30. Warning: raising maximum LP does not raise current LP! You must heal it on your own.
Time to move on. Under Scarlet Cog, next to well you see Green Cog.

That’s a Green Cog. Ignore if you like, that’s no problem. But break ’em, and you get nice prizes like items and Force. Same as the other cogs, Time Scars’ll get in your way, so be careful with ’em.
When you interact with either Blue or Green Cog, you can attempt to Destroy it or Ignore. Green cogs are guarded by normal Time Scars – no special preparations needed. For this cog you gain two Repose Seeds (normally rewards are random, but not in this case).
Those Repose Seeds are consumables. Once you get one of ’em, you can buy more in Shadeling Town. So, might be good to check back in.
Follow his advice and return to Shadeling Town – just try to walk on stone stairs next to place where you started to return to Time Core. Check your garden and look what seed grown into. Flowers will appear after growth rate gets to 5 or more (incidentally, it is same as count of battles). At this time, you can probably get only these things:
- [Repose Seed] Heals wounds (50). Value: 20 Force. You didn’t fight enough! Fight more.
- [Joy Flower] Heals wounds (100). Value: 60 Force.
- [Alstroemeria] EC+1. Value: 100 Force.
- [Pleasure Fruit] Heals wounds (250). Value: 120 Force. Strongest healing plant. As you are long, long way from having even close to that much LP, currently there is no point in waiting so long for it. Better to harvest something else earlier.
- [False Begonia] AGL +20 (For duration of battle). Value: 300 Force.
- [Maneater Gerbera] PSY +20 (For duration of battle). Value: 300 Force.
If you did not got what you want, just fight once or twice more, then return back. You want to have two seeds planted at once at all times. Use one of seeds that you gained from Green Cog.
Explore entire area and grind some more. Somewhere along the way, you will acquire two new skills. One of them makes defeating Scars guarding Blue Cogs very easy.
- [Aura] EC-2 Heals Wounds (C). Gained by using Guard 5 times and having max LP >= 30. Pretty costly healing skill.
- [Brain Blue] EC-2 / LP-5 Inflicts damage (B). Gained by using Shock many, many times (at least twenty, probably more). It is first skill that require more than one EC, making neccessary to wait for it without using Shock. Best way is to Guard first turn and attack with Brain Blue during second turn.
Outside do not have anything interesting anymore (except invulnerable Scarlet Cog). You have to enter two buildings – each with one Blue Cog. Make sure you gained skills mentioned above and distributed Force to stats. Yes, you will lose if you are unprepared and weak. Start with left bottom house.

Interact with Cog.
That’s a Blue Cog. These blue cogs seem to go an’ amplify the power of the scarlet cog. Point is, you definietly gotta destroy these as you explore. A slightly tougher Time Scar’ll get in the way of destroying it, so be prepared for that. If you’re not sure, use some Force to incerase your stats.
“Slightly”, hah. Confirm intent of destroying Cog.

Welcome, huh. Well, this… angeloid… thing certainly looks welcoming. It is powerful comparing to previous Time Scars, so do not fuck around. You do not want to get Stardust in face without Guard. At least it is pretty slow.
- Tactics: Guard, Brain Blue, done.
- Skills: Guard, Shock, ?(never used), Stardust (2 EC).
Now second home.

Deal with second Welcome in same way as first. Game will show Scarlet Cog changing color.
Hey, that Scarlet Cog turned blue. So now you can go where you couldn’t before.
Time for last Cog. Return back to it.
Once you break the Scarlet Cog – well, although it’s blue now – you’ll get back a Hand Fragment. This is just a primer, so there ain’t one. Guess I’ll give you a present instead.
I like presents.
This last Scar’s the toughest one. Get ready before you fight it.
I like boss battles. Let’s get to it!

Well, games surely are Time Devourers. This scorpion-like entity, while stronger and faster than Welcome, still falls before might of Brain Blue.
- Tactics: Guard, Brain Blue, done. In unlikely case it survives Brain Blue, finish with Shock.
- Skills: Guard, Shock, ? (never used), Scorpion Flame (3 EC).
Enter last home.

Talk with shadeling.
That’s end of the primer. Good stuff! Alright, here’s your present.

If the warden seems busy, go on an’ help him out. Right, let’s take you back.
You are transported back to Time Core. Equip your first accessory in same way you equip skills.
- Coral Hairpin: [Self-Esteem] LP+25%.
You can have equipped single accessory at once, but since it is only one, choice is obvious. Ok, time for last preparations before you start game proper in Land of Life. Return to main hall with Great Clock and go to door at left.

Alice finds herself in pretty long corridor with five doors. Ask shadeling about them.
The time-stopped Land of Life awaits beyond these doors. When you clear each area, the Time Scars and treasures will get stronger and better. Basically, don’t be indecisive.
Well duh, it’s called “game progression”. Near third door there is another shadeling.
If you press Up or Down in battle, you can use “Just Watch.” The effect? …I guess you just watch?
Only use is probably when you have to accumulate EC and all your selected skills use up ECs. Or as excercise in masochism. Info hut gave you information about skill where one of conditions is winning battle with low amount of LP, so I guess it could be used for that too.
Okay. Tend to garden, assign Force to stats and return here. Let’s meet your destiny. Use first door.
– Town of Turkur –
Enter.
Oh, cutscene?

Gulinello is silent. Tiska asks again.
Gulinello?
…I thought it bezt not to say, but… Well, you’d soon find out anyway.
?
All the fragments are gathered in the south of the Land of Life… on Malis Island.
! That – that’s…
Screen goes dark.
A fateful place… yes. For you… and for Alice.
Hmmm. Whole broken Clock incident has something to do with not only Tiska, but also Alice. In fact, looks like Tiska knows something about Alice that Alice does not know. We will find out eventually, I’m sure.


